-
大小: 9KB文件类型: .zip金币: 2下载: 0 次发布日期: 2021-06-06
- 语言: 其他
- 标签: tensorflow python
资源简介
采用tensorflow实现猫狗的识别。首先是进行模型的撰写,然后训练,最后测试。具体的训练图片在网上下载即可

代码片段和文件信息
#%%
import tensorflow as tf
import numpy as np
import os

#
img_width = 208
img_height = 208


#%% 获取图片 及 生成标签
train_dir = ‘G:/tensorflow/cats_vs_dogs/data/train/‘

def get_files(file_dir):
    ‘‘‘
    args:
        file_dir: file directory
    Returns:
        ist of images and labels
    ‘‘‘
    cats = []
    label_cats = []
    dogs = []
    label_dogs = []
    for file in os.listdir(file_dir):
        name = file.split(‘.‘)
        if name[0] == ‘cat‘:
            cats.append(file_dir + file)
            label_cats.append(0)
        else:
            dogs.append(file_dir + file)
            label_dogs.append(1)
    print(‘There are %d cats \nThere are %d dogs‘ %(len(cats) len(dogs)))

    image_list = np.hstack((cats dogs)) ## 将图像堆叠在一起
    label_list = np.hstack((label_cats label_dogs)) ## 将图像标签堆叠在一起

    temp = np.array([image_list label_list])
    temp = temp.transpose() #矩阵转置
    np.random.shuffle(temp) # 打乱存放的顺序

    image_list = list(temp[: 0]) # 获取图片
    label_list = list(temp[: 1]) # 获取标签
    label_list = [float(i) for i in label_list]

    return image_list label_list

#%%
    # 对图片进行裁剪
def get_batch(image label image_W image_H batch_size capacity):
    ‘‘‘
    args:
        image: list type
        label: list type
        image_W: image_width
        image_H: image_Height
        batch_size:batch size #每批次的图像量
        capacity: the maxmum elements in queue
    Returns:
        image_batch: 4D tensor [batch_size width height 3]dtype=tf.float32
        label_batch: 1D tensor [batch_size] dtype = tf.float32
    ‘‘‘
    # 类型转换函数,返回张量
    image = tf.cast(image tf.string) # 数据类型转换 image->string
    label = tf.cast(label tf.int32)  # 数据类型转换 label->int32

    # make an input queue 生成输入对列
    input_queue = tf.train.slice_input_producer([image label])

    label = input_queue[1] # 读取标签
    image_contents = tf.read_file(input_queue[0]) # 读取图像 string类型
    image = tf.image.decode_jpeg(image_contents channels = 3) #解码

    ########################################
    # data argumentatioan should go to here
    ########################################
    # 对图片进行裁剪或扩充【在图像中心处裁剪】,统一大小
    image = tf.image.resize_image_with_crop_or_pad(image image_W image_H)
    # 数据标准化 训练前需要对数据进行标准化
    image = tf.image.per_image_standardization(image)
    # 生成批次 在输入的tensor中创建一些tensor数据的batch
    image_batch label_batch = tf.train.batch([image label]
                                              batch_size = batch_size
                                              num_threads = 64
                                              capacity = capacity)
    # 重新生成大小,即将label_batch变换成[batch_size]行的形式
    label_batch = tf.reshape(label_batch [batch_size])

    return image_batch label_batch

    #%% test :  matplotlib.pyplot绘图 绘制直线、条形/矩形区域
    import matplotlib.pyplot as plt

    BATCH_SIZE = 5 # 批次中的图像数量
    CAPACITY
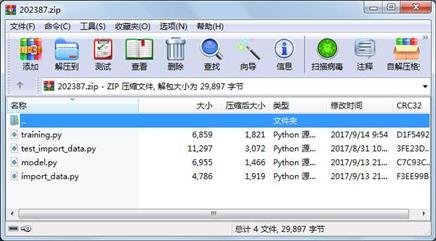
属性 大小 日期 时间 名称
----------- --------- ---------- ----- ----
文件 4786 2017-09-13 21:11 import_data.py
文件 6955 2017-09-13 21:34 model.py
文件 11297 2017-08-31 10:14 test_import_data.py
文件 6859 2017-09-14 09:54 training.py
- 上一篇:计算机网络重点归纳总结详细
- 下一篇:基于强化学习的商品推荐系统.docx
相关资源
- Pythonamp;课堂amp;笔记(高淇amp;400;集第
- Python中Numpy库最新教程
- 用python编写的移动彩信的发送程序
- Python全栈学习笔记面向对象大作业:
- python实现的ftp自动上传、下载脚本
- Python版的A*寻路算法
- IronPython IDE
- TensorFlow1.4 官方手册
- pip-10.0.1.tar.gz
- Data Science from Scratch 2nd Edition
- shape_predictor_68_face_landmarks.dat.bz2 68个标
- 爬取豆瓣电影TOP250程序,包含非常详
- 中文维基百科语料库百度网盘网址.
- MSCNN_dehaze.rar
- 基于双向LSTM+tensorflow中文分词
- 爬取豆瓣排行榜电影数据(含GUI界面
- 字典文本资源
- Brainfuck / OoK 解码脚本
- 案例实战信用卡欺诈检测数据集
- TensorFlow Machine Learning Cookbook+无码高清
- Hands-On Machine Learning with Scikit-Learn an
- TensorFlow 官方文档中文版高清无码PD
- 招商策略_抱团启示录那些年我们一起
- sip-4.19.zip
- 树莓派3b+学习使用教程
- numpy 中文学习手册
- pytorch-1.4.0-py3.7_cpu_0.tar.bz2
- 机器学习实战 高清完整版PDF
- 泰坦尼克号0.81准确率实验报告.docx
- 基于tensorflow的深度学习图像分类案例
 川公网安备 51152502000135号
评论
共有 条评论